Art In Context

Art In Context

M.C. Escher is a surreal environment artist whose work has influenced many even after death. He is well known for his perspective based optical illusions which has lead to him being a world famous graphic artist. His work is enjoyed by millions of people all over the world. He has not only influenced many artists across the world but has expanded into many companies in the games industry such as the indie studio “ Ustwo ” in the creation of an award winning iOS game by the name of “ Monument Valley “. Within my essay i will be assessing a specific piece of art by Escher and showing how deep M.C. Escher’s influence affects the game mechanics and design within Monument Valley.

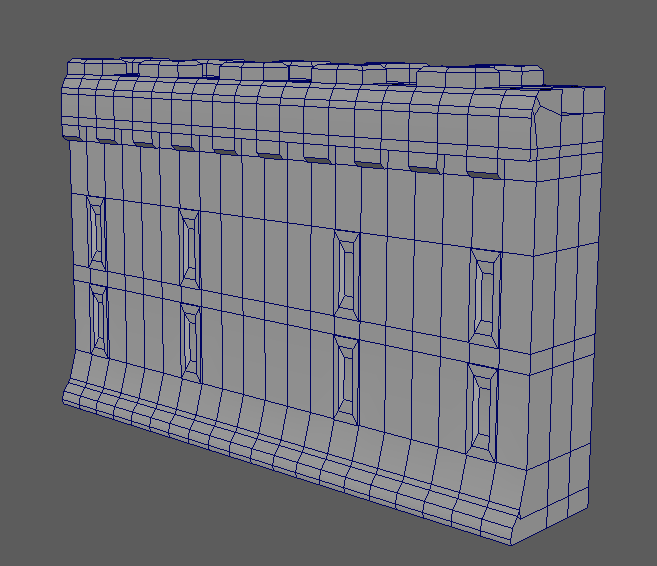
M.C. Escher’s famous piece of art by the name of “ Tower of Babel “ is a great inspiration for Monument Valley as it is similar to the level design , the shape of the tower is replicated in levels with its platforms having an optical illusional alignment to give puzzle to the game and make mechanics more complex that the average puzzle game. Even the texture and design of the walls within the levels are influenced by the “Tower of Babel” artwork , the general style of the levels are mainly plain surfaces with the occasional detail of a pattern to trim the lower level of the walls tending to be swirls or small zig zags. This brings me to depth and perception , the tower of babel uses two vanishing points each located in top two corners of the art and a nadir point at the bottom middle , vanishing points are used to align all the platforms to give it depth . The nadir point tends to be used for corners , deciding where to end bridges , rooftops and many other things, it is the point in which gravity is pulling towards. Depth and perception is something key to artwork , which makes it appealing to eye. In turn, aesthetics is something game designers need to take into account when creating a game – “ is it appealing to eye?” , “ is it a catchy art style that fans will be pulled in with ? “ . Remember, art matters not just the game play. Monument Valley uses platforms and bridges in the style of architecture within Escher’s Tower of Babel . Incongruous design elements on opposite ends of the parallel lines create confusion which plays to the game advantage quite a lot meaning it is more difficult to proceed further into the game’s levels but also aligning the platforms that you walk on.

M.C. Eschers artwork is very old especially the tower of babel piece which was made in the year 1928 meaning he did not have the power of creating art like we do today. I will be showing how it has influenced Monument Valley with level design from reference images and screenshots from ingame gameplay within monument valley.

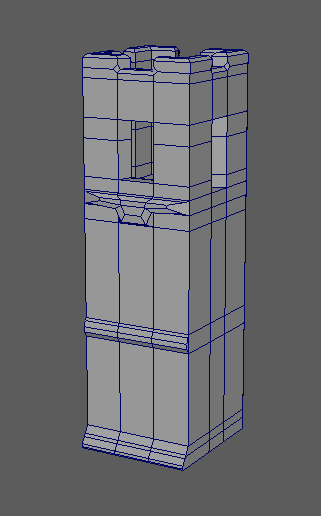
As you can see from these screenshots the towers within level design are both similar in structure to the tower of babel. I am not saying that they are pixel perfect to the piece of art because they are not , however looking at them you can see where the inspiration has came from. The image on the left has the 3 towers stretching up above the platform which centers a middle object , being a device you can rotate to turn the platform into a full square around it.not to forget the furthest tower to the left also has the window positioned similar to the tower of babel being 3 quarters up the main body of the tower on each wall. The tower on the right with the nighttime sky is also a tower themed from the tower of babel, not so much in shape and layout but more in the looks of the tower. The style of the towers similar to babels and the arch way windows / entrances half way up the wall also link back to looking along with babel in all its glory.

So back to my main point M.C. Eschers work in the famous art piece The tower of Babel has inspired many especially indie studio “usTwo” in the creation of famous ios game “monument valley”. His style of perspective based art work has really laid out the basis for such an amazing game and given it a framework for “usTwo” to really capture such beauty in the towers throughout the levels. The art piece has pretty much handed monument valley its gameplay mechanics and features . This i have proven through screenshots of in game levels and comparing them to the art piece by escher


Synoptic Project #4 – Castle Assets and My Animation Sandbox!

So I have a small post here to cover the rest of my work that I have done so far and get me all up to date (minus the rock models I did in class that I will show off next week).

First off I want to show the 2 castle assets I made , one being a basic tower and the second a wall segment , on our spreadsheet “Caleb” is assigned to these but wanted help so I helped him out , I unfortunately do not know if they are correct / to his standards but at the moment I will keep them if not when it comes to it I can re do them but here they are :

Second point I would like to show is my “animation sandbox” I have thrown together , this is a little scene to mess around in / test animate and so on , it is made up of my walls , towers a plane to create a ground / path , a bridge made from a cube that i extruded and then trees made by a member of my team “James” These trees will show as planes for branches still because I do not have its texture at home which is where I am writing this so they will look a bit strange.


Finally just to keep the blog updated on the team progress here is the scene we are working on in the spreadsheet :


Overall feedback to self : I am enjoying the project , I feel like I have already made amazing progress both learning and with the tasks i’m given, I feel this is a good productive first week. Over the next day or two I think I will try make some more models and maybe work on more animation. I will update my blog again when i have made progress.

Synoptic Project #3 – Character Rig + Walk Animation

Now that I have a model for the main character I decided to not texture it yet and just take a low level version of the model in to Maya and start to rig , I used a pre-built human skeleton that Maya gives you and then lined up all the joints to the correct places, then I connected it to the model by going to skin > bind skin , this attaches them in place. Here is a image of the skeleton in the model :

Now I had the skeleton in the skin I need to paint on the skin weights , again I navigated to the top menus and clicked “paint skin weights” now I am met with a load of options but the ones I use are the solid circle brush with the options “paint” with “replace” and occasionally the “smooth” option just in case things need cleaning up . I also click the “use colour ramp” option , this gives me a better view of the areas affected with more then just a white to black gradient. Here is the menu :

I am going to show an example of the weights I have painted , here is the left foot :

Finally now the skin is all painted and rig set , I made a simple walk animation. Here is the reference image I used :

4-walk-cycle-animation

I used the same technique as the reference planes when doing the model , I made it a reference plane and then posed the model in position, key framed it then skipped to the next 15 frames and so on repeating the process until I had this little animation here for a walk cycle which I can smooth out in the future and loop it when needed :

gif-4

Since this gif ^ I have made it not take such big steps but I am proud how this is turning out and I like the progress I am learning within my animation / rigging skills and look forward to the rest of the project.


Synoptic Project #2 – Creating The Main Character

So we got straight to work on the project , we have many documents / spreadsheets to keep us organised which I will showcase when necessary. My first task was the character (I am writing these posts a couple days late). The main character is a teen boy. Unfortunately we did not really concept out the characters looks or anything , only real thing we decided was that he was going to wear a hoodie so i looked online for some free character reference images to use on some planes to get a general shape for the characters body in Maya. Yes they are spiderman. Here they are (As I said , I did not draw these) :

I add these images as a texture to 3 planes in Maya and line them up with a cube so that they are positioned correctly as one of the planes images were slightly off centered. Once I had set up my planes with the reference images , I added them to a new layer and converted the layer to be a reference so that I could not interact with the planes . You can see it set here:

After this I set my cubes opacity down so that I can see both the cube and the planes , I also set the view port to show wire frame on textured objects. After quite some time later I got to this model here :

I then ported it to Mudbox to get a higher detail model , I did this by going File>send to Mudbox. In Mudbox I used the “bulge” tool to give a more rounded body structure to things like arms legs and so on. I then spent a good few hours modelling the character , after feedback from my group we decided that it was a bit too bumpy. Here is 2 gifs of the model that was too bumpy with colour that i very messily threw on the model to get a general feel for colour :

So from here I used a mixture of the Smooth tool , Sculpt tool , Fill tool , Scrape tool and the ability to add new subdivision levels for a more smooth looking model. Here is the final model (untextured as I still need to texture it) :


Synoptic Project #1 – The Group + Idea

So as my first synoptic project blog post I am going to explain these posts and how they will work. I will be posting at least 1 a week (if I can keep to the routine and remember). They will consist of  :

  • scrum feedback / run down
  • progress on animations
  • progress on rigging
  • progress on 3D models and textures
  • concepts and procedures of the design
  • any other relevant information

I will try keep the posts short with images when available.


So , finally the project time that we all have been waiting for. After being told by tutors and lecturers to get these done I am. The synoptic project is a project on the course that will take up the remaining segment of the course. The task is to create a game , animation vfx sequence with the themes we were giving being :

  • Fictional Character
  • Place of significant interest
  • Connection to local history (something along the lines of that)

We then all had to come up with an idea , mine was a tower defense game based off the xbox and pc game Sanctum 2. If interested here is the link to the slideshow pitch I made :

https://docs.google.com/presentation/d/1ajS2Wi9ljZRd0peb8SvKmyW0-YOQCv8zykO4QIs5KMU/edit?usp=sharing 

In my pitch I included some models that I sculpted in MudBox 2017 quickly , these were my favorite part of the pitch and i liked how they came out for the short amount of time spent on them. They are all different classes and were just concept models. The guy with the helmet is a soldier , goggles on head is engineer , rather large guy is the heavy and the thin guy with the look a like loaf of bread on his head is the scout. My pitch was also to Stephen Hey from EA/Chillingo who gave me some good feedback towards the end of the day :

After we pitched the ideas over 2 days we all voted on 3 ideas that we would like to work on in order of favorite and also listed our job specialties and things we are willing to do within the project.

I wrote that I am willing to do “3D , Animation and Rigging” and I voted for

  1. Final Spark (Animation)
  2. Asimov Dilema (Game)
  3. Wonderland (VR/Game)

The project I ended up on was Final Spark along with 4 other members of the class, here is the list of members and roles :

As you can see my main role is “Lead Animator”.

What is a lead animator?
A Lead Animator is the “Animator in Chief” in charge of an animation project for a film studio, a television studio, or a game development studio. You see, animation is a complicated process. Whether done by hand or on a computer, it needs a team of talented Animators, led by a Lead Animator.


The idea of the animation in a short description is , a boy is walking through some trees / down a path and then trips over near the front of a castle and then when he looks up a giant robot emerges from the ground and goes to grab in and just as the robot is about to get in contact with him the screen cuts to black and ends. The idea may not be 100% that as we are still redoing the storyboard and deciding on what exactly is still to go in and not to go in but that’s the general idea.

We were also given this feedback and advice by the lecturers :


Time to get to work !


Maps Within Texturing

This post is just covering the definitions of different types of maps , I am going to use this as reference in the future.

Here are the definitions :

Normal mapping used to re-detail simplified meshes. In 3D computer graphics, normal mapping is a technique used for faking the lighting of bumps and dents – an implementation of bump mapping. It is used to add details without using more polygons.

A Diffuse map is the most common kind of texture map. It defines the color and pattern of the object. Mapping the diffuse color is like painting an image on the surface of the object.

Bump mapping is a technique in computer graphics for simulating bumps and wrinkles on the surface of an object.

Specular maps are the maps you use to define a surface’s shininess and highlight colour. The higher the value of a pixel (from black to white), the shinier the surface will appear in-game.

Norse Environment Design

(Forgot to post this a while back so here it is)

Recently our lecturer gave us a new task that we will be working on individually. The task is to create a 3D environment concept either in programs like Photoshop or simply a sketch. The environment had to link in to a certain theme and be 3D Modeled. The steps I will  be taking to finish this task will be :

1)  Story Boarding

2) Thumbnail Designs

3) Mock up Image in Photoshop To Show What It Can Look Like

4) 3D Modeled Scene in Maya

5) Add Some Lighting and Render Out

6) Take in to Photoshop and Colour over It and add any extra Detail Needed.

The theme was “Norse Mythology” and “Future Technology”.  With this theme in mind I started research online to find some nice images that I could use as reference / inspiration when making this and get brief vision of the product I will end up with.

Once I had rough ideas in my mind I started to create a mood board in Photoshop of images linking to the Norse Mythology part of the theme and create a image bank of them that I can later sample and reference. As my environment is going to be focused inside of a building I will use house images and images of furniture I can use.

Lost images for this

Second step was to create some thumbnail sketches of parts of the environment that I can create. These involve overall room sketches and then small objects /features of the environment .

Lost images for this

Third step is to do something our lecturer taught us ,this involves grabbing loads of images from your mood board / online and putting them all in to Photoshop then rubbing out parts , duplicating parts and simply making the image come together as one , to create my image concept I used about 7 pictures of inside buildings , one featuring a fire which is my main focus point of the image and then 2 images for the side doors , image of some rocks to barricade / fortify a door and a image for some wooden pillars and then wall images and roof images , once the images were roughly in place I rubbed the parts out that were not needed and started to shade the images in using a mix of clipping masks and general  overlays on the layers. I made sure to keep the glow from the fire in the image and made sure it stretched out across the image, I had to colour in the wood for the pillars / beams on the rood to match the rest of the wood and also shade in the doors and adjust the perspective of them with the walls so things would slot in to place with the roof. For the floor I had to just a mixture of the “clone stamp” tool and the default brush adjusting opacity to add little dots of colour when needed to add mixture to the floor. with lots of work and time on this I came to this final concept for my environment that I am proud of (keeping in mind it is not fully the final product for the environment and can still be adjusted later on in Maya and photoshop at the end.) :

norse-enviroment-design-concept-image

Fourth step is to now go in to a 3D software ( my preference here is Maya ) and create a nice scene in which i can render it and open in Photoshop to add a final touch to add any objects that i do not have to model and adjust any lighting / colour the image in. So after a bit of time i had created the room for this environment but i felt like i needed to add something in there so when browsing google i found this image :

I decided this could fit in with my environment and made a replica model of it and added it to the scene. I also added 3 lights to the scene one located back center of the room low down and one either side in the walls at the back. I rendered one version of the image with no lighting at all , one with ray tracing turned off and one with them turned on , this was also advised by my lecturer in a discussion while rendering and was suggestion that i could use all the images to sample / overlay to create a better final product. I know that i still have not incorporated the “Future Technolagy ” theme in to my project yet but I plan on doing this in the final Photoshop stages if possible or i may go back and add another model in to my render. Here is the images of my renders :

*Update 13/01/2017* We have not done much more work on this in class so I have not finished the final steps however this post is over due so I may come back to finish the rest in another post in the future.


NextGen Year 2

(This post is late and was meant to be posted a month ago but i did not finish it and it was sat in my drafts so i decided to write some more and post it.)

Image result for nextgen

Here i am , back again with another year of the NextGen course. My main focus will be 3D for games / VFX and Animation for all areas of the industry. These will be the areas of the course i am going to specialize in,  they  will be the areas i will take in to Uni and study further in. My goal is to finish this course and move on to be either a game environment artist ,  VFX 3D artist or 3D animator in Uni and from there move in to  the industry. I would like to have completed a full environment / map by the end of the 2nd year of this course and /or a good level of an animation both 3D and 2D that i can use in my portfolio.


That is a small post of my goals / aims for this course and what i am going to try after this course.

Here is to another year

Image result for 3d dancing gif

 (Thought it was funny)

Models In Maya – Building Pack – Part 2

Here is a part 2 of my “Building Pack” blog posts.

Part 1 can be found here :

Models In Maya – Building Pack – Part 1

In the previous post i mentioned how i watched two videos on YouTube of a guy walking through the basic steps to creating a building and another of a more detailed look in to buildings , i then went ahead and created the two buildings showcased in that post.

Now that i had completed them i decided to continue with more and make a few more posts out of it so here it is…

After i have a few posts of buildings and some core city / town assets i think i am going to try create some sort of little blocked out map that could possibly go ahead and either be used in a game or a nice little render image that i can make nice for some portfolio work.


First of all the main thing i personally think of when thinking of a city is the sky scrapers and other tall buildings so i decided to model 2 bottom floors to a building including doors windows and stairs connecting the 2 floors and then i now had a asset which can be copy and pasted and moved up to place in a tower to form my final products , i made 4 different height skyscrapers and they just needed a roof on each of them. i got a simple block and cut out a hole for access to the roof via stairs , then i added a little wall around the top of the roof and i was good to go. Here is a gif :

building3gif

Next i decided to look up online for a list of building types for inspiration and came across apartment blocks but decided to change that to a type of hotel with a pool on the roof and ended up with this model :

building4gif

As you can see from both wire frame parts to the gifs all the buildings are fitted with the staircases so these buildings could be thrown in to a software with no texture and be ready to use.

I have decided to try get 2 or so buildings done per day / 2-3 days depending on other work i need to do.  So these parts will be 2+ models per post for now a day.

Models In Maya – Building Pack – Part 1

So i decided with recently learning more about Maya that why not model a few things in my spare time , i was looking up on YouTube the best way to make buildings and found some nice videos. After watching the 12 minute long video of the basics when making a house including door frames , walls , stairs and floor i decided to evolve this and add a few more things like a roof , ladder , power generator and balcony along with some simple solar panels on the roof. Here is a gif of my first building (un textured like everything i do these days because texturing is horrible)

building1gif

After having my first building model done i decided to look into another one of the videos  and again followed along with my own touch which led me to making a model with no insides that are visible and rather a solid blocked out building from the outside including a side footpath / road and more detail to the building :

building2gif

I will be completing some more related models and posting them in some more parts and eventually i will get round to texturing them … Great.